 ## A command to squash all ads in all browsers
```shell
sudo maza start
```
Like Pi-hole but local and using your operating system.
Simple, native and efficient **local ad blocker**. Bash script compatible with **MacOS**, **Linux**, **BSD** and **Windows Subsystem for Linux (WSL)**.
- Just **bash** 🤖.
- It affects **any browser** or software installed 😱.
- You **don't have to install any browser extensions or applications** 🚫, you just use the tools of your operating system.
- You update the list of DNS to be blocked with a **single command** 😎.
- Pure **Opensource** ❤️.
## A command to squash all ads in all browsers
```shell
sudo maza start
```
Like Pi-hole but local and using your operating system.
Simple, native and efficient **local ad blocker**. Bash script compatible with **MacOS**, **Linux**, **BSD** and **Windows Subsystem for Linux (WSL)**.
- Just **bash** 🤖.
- It affects **any browser** or software installed 😱.
- You **don't have to install any browser extensions or applications** 🚫, you just use the tools of your operating system.
- You update the list of DNS to be blocked with a **single command** 😎.
- Pure **Opensource** ❤️.
 ## Index
- [Commands](#-commands)
- [Install or update](#%EF%B8%8F-install-or-update)
- [Auto update of domains to be blocked](#-auto-update-of-domains-to-be-blocked)
- [Uninstall](#-uninstall)
- [Not blocking certain domains](#-not-blocking-certain-domains)
- [Add custom domains to block](#-add-custom-domains-to-block)
- [Alternative DNS list](#-alternative-dns-list)
- [DNSMASQ (or support sub-domains: wildcards)](#dnsmasq)
- [Create your own Pi-Hole](#-create-your-own-pi-hole-server-with-maza)
## Help me continue to improve
## Index
- [Commands](#-commands)
- [Install or update](#%EF%B8%8F-install-or-update)
- [Auto update of domains to be blocked](#-auto-update-of-domains-to-be-blocked)
- [Uninstall](#-uninstall)
- [Not blocking certain domains](#-not-blocking-certain-domains)
- [Add custom domains to block](#-add-custom-domains-to-block)
- [Alternative DNS list](#-alternative-dns-list)
- [DNSMASQ (or support sub-domains: wildcards)](#dnsmasq)
- [Create your own Pi-Hole](#-create-your-own-pi-hole-server-with-maza)
## Help me continue to improve
![]()
 Refresh your DNS cache
```bash
sudo dscacheutil -flushcache; sudo killall -HUP mDNSResponder
```
#### 4 Restart/Start Maza
```bash
sudo maza stop
sudo maza start
```
### Linux (Debian/Ubuntu)
#### 0 Update Maza
```bash
maza update
```
#### 1 Install
```bash
sudo apt update
sudo apt install dnsmasq
```
#### 2 Configure
Edit file in path.
```
/etc/dnsmasq.conf
```
Add the following line at the end.
```
conf-file=(your user path)/.config/maza/dnsmasq.conf
```
Example
```
conf-file=/home/myuser/.config/maza/dnsmasq.conf
```
Start DNSMASQ.
```bash
sudo systemctl stop dnsmasq
sudo systemctl start dnsmasq
sudo systemctl enable dnsmasq
```
#### 3 Tell your OS to use your DNS server
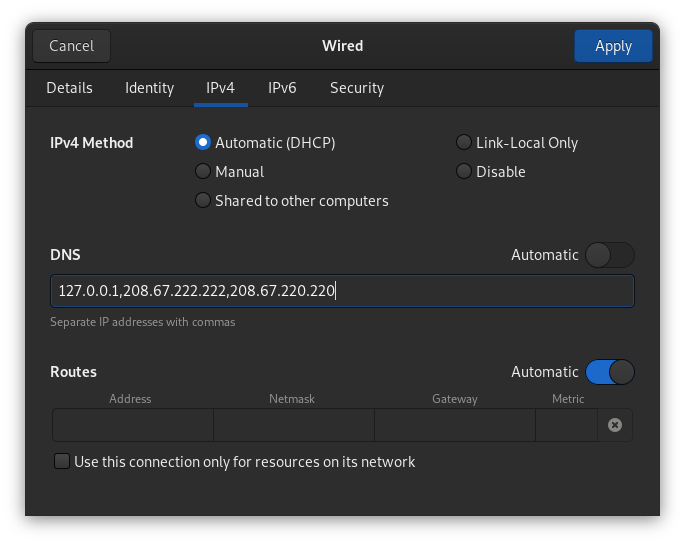
##### 3.1 Gnome Shell
In Gnome Shell, open `Settings->Network`. Click in your connection.
Refresh your DNS cache
```bash
sudo dscacheutil -flushcache; sudo killall -HUP mDNSResponder
```
#### 4 Restart/Start Maza
```bash
sudo maza stop
sudo maza start
```
### Linux (Debian/Ubuntu)
#### 0 Update Maza
```bash
maza update
```
#### 1 Install
```bash
sudo apt update
sudo apt install dnsmasq
```
#### 2 Configure
Edit file in path.
```
/etc/dnsmasq.conf
```
Add the following line at the end.
```
conf-file=(your user path)/.config/maza/dnsmasq.conf
```
Example
```
conf-file=/home/myuser/.config/maza/dnsmasq.conf
```
Start DNSMASQ.
```bash
sudo systemctl stop dnsmasq
sudo systemctl start dnsmasq
sudo systemctl enable dnsmasq
```
#### 3 Tell your OS to use your DNS server
##### 3.1 Gnome Shell
In Gnome Shell, open `Settings->Network`. Click in your connection.
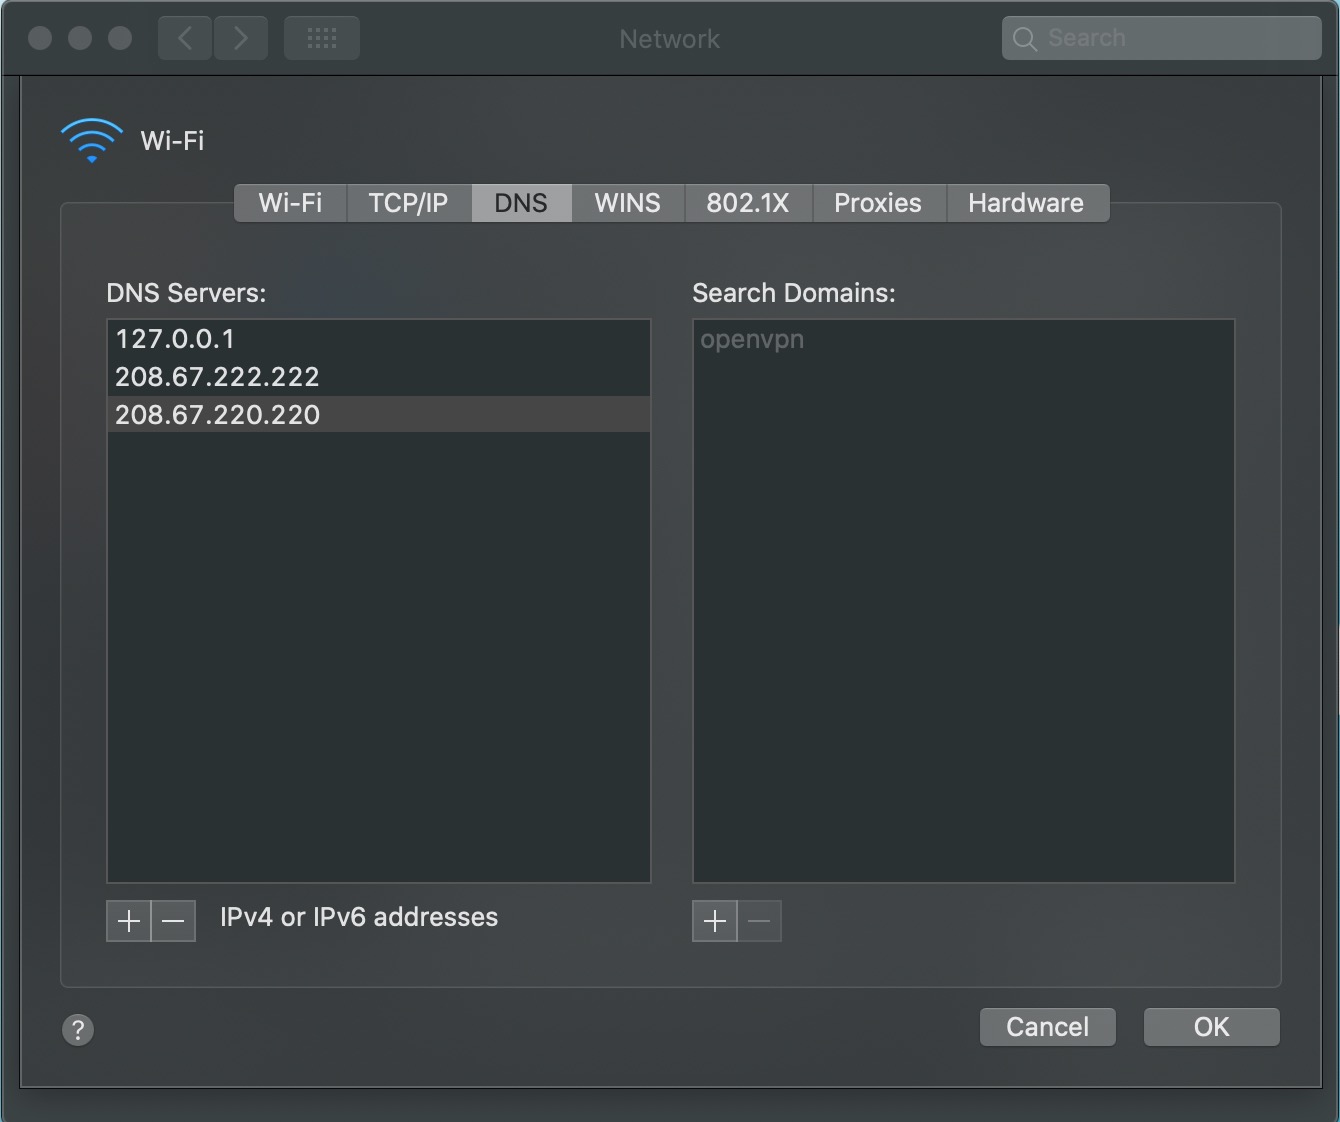
 Add your local server (dnsmasq), and the other 2 belong to OpenDNS, which you can use any other.
```bash
127.0.0.1,208.67.222.222,208.67.220.220
```
Add your local server (dnsmasq), and the other 2 belong to OpenDNS, which you can use any other.
```bash
127.0.0.1,208.67.222.222,208.67.220.220
```
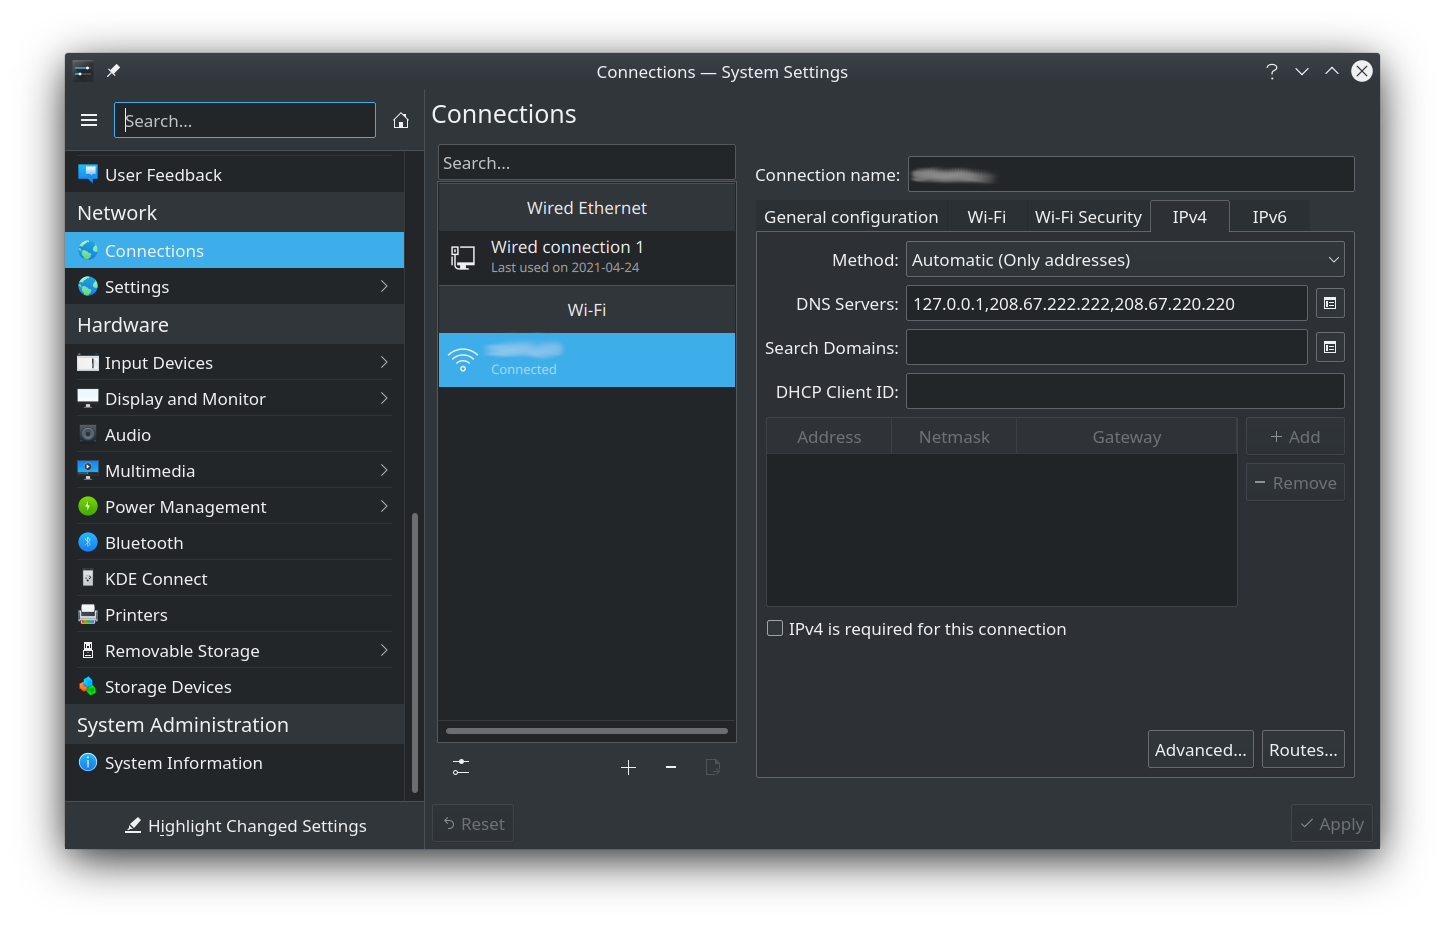
 ##### 3.2 KDE Plasma
In KDE Plasma, open `Settings->Network->Connectios`. Click in your connection and tab `ip4`.
- `Method`: Automatic (Only addresses).
Add your local server (dnsmasq), and the other 2 belong to OpenDNS, which you can use any other.
- `DNS Servers`: `127.0.0.1,208.67.222.222,208.67.220.220`.
##### 3.2 KDE Plasma
In KDE Plasma, open `Settings->Network->Connectios`. Click in your connection and tab `ip4`.
- `Method`: Automatic (Only addresses).
Add your local server (dnsmasq), and the other 2 belong to OpenDNS, which you can use any other.
- `DNS Servers`: `127.0.0.1,208.67.222.222,208.67.220.220`.
 #### 4 Restart/Start Maza
```bash
sudo maza stop
sudo maza start
```
### Bonus: dnsmasq is in charge of solving all DNS
Add in configure file: `/usr/local/etc/dnsmasq.conf`
```
no-resolv
server=208.67.222.222
server=208.67.220.220
```
### Bonus: dnsmasq have `localhost` domains
If you want all your `.localhost` domains, for example, point to localhost add in configure file: `/usr/local/etc/dnsmasq.conf` or `/etc/dnsmasq.conf`.
```
address=/.localhost/127.0.0.1
```
## 🍓 CREATE YOUR OWN PI-HOLE SERVER WITH MAZA
You can easily create your own DNS server on a Raspberry Pi, VPS or wherever you want, to connect your devices in just 10 commands thanks to Maza. Follow the [tutorial](https://programadorwebvalencia.com/create-your-own-pi-hole-with-10-commands/).
## ⚠️ CAUTION
Remember to make a backup copy of `/etc/hosts` in case of unforeseen circumstances, neither the project nor its author will be responsible for any possible repercussions derived from not carrying out this action.
## 🧑🎨 Credits
Andros Fenollosa
#### 4 Restart/Start Maza
```bash
sudo maza stop
sudo maza start
```
### Bonus: dnsmasq is in charge of solving all DNS
Add in configure file: `/usr/local/etc/dnsmasq.conf`
```
no-resolv
server=208.67.222.222
server=208.67.220.220
```
### Bonus: dnsmasq have `localhost` domains
If you want all your `.localhost` domains, for example, point to localhost add in configure file: `/usr/local/etc/dnsmasq.conf` or `/etc/dnsmasq.conf`.
```
address=/.localhost/127.0.0.1
```
## 🍓 CREATE YOUR OWN PI-HOLE SERVER WITH MAZA
You can easily create your own DNS server on a Raspberry Pi, VPS or wherever you want, to connect your devices in just 10 commands thanks to Maza. Follow the [tutorial](https://programadorwebvalencia.com/create-your-own-pi-hole-with-10-commands/).
## ⚠️ CAUTION
Remember to make a backup copy of `/etc/hosts` in case of unforeseen circumstances, neither the project nor its author will be responsible for any possible repercussions derived from not carrying out this action.
## 🧑🎨 Credits
Andros Fenollosa